Affect of PV Spacing Off Camper Van Roof On Heat Transfer and Efficiency
There has been a fair bit of discussion on the thermal and electrical performance affects of the spacing between a solar panel and the roof of the camper van that the panel is mounted to. If mounting the PV panel closer to the roof increases the temperature of the panel, then the performance of the PV panel is degraded and the heat transfer to the van interior is increased, which is a negative when trying to cool the van on hot days.
This test looks at the PV panel and roof temperatures for three configurations..
- A regular PV panel mounted close to the roof (0.5 inches above roof)
- A regular PV panel spaced away from the roof (3.5 inches above roof)
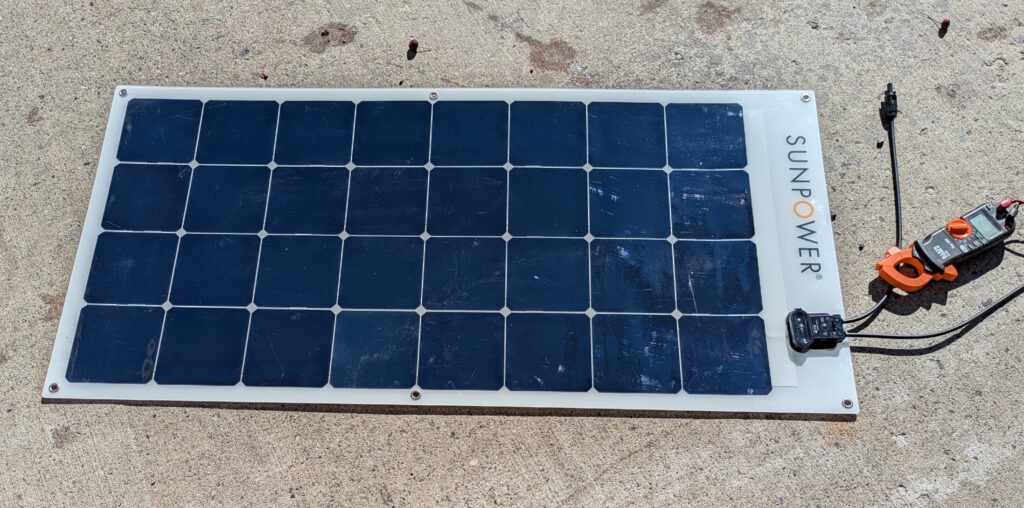
- A flexible plastic PV panel mounted in direct contact with the roof.
The regular PV panel is the 300 watt 39 by 78 inch panel I’ve been using on my van for 10 years. The flexible panel is a new Sunpower 100 watt 22 by 45 inch thin, flexible panel.
For each setup, some of the temperatures are logged, and the PV panel performance loss and heat transfer increase are estimated. The aerodynamics are discussed.

Spaced 1/4 inch off roof at center and 0.5 inches at edges. As close as possible to the van roof.
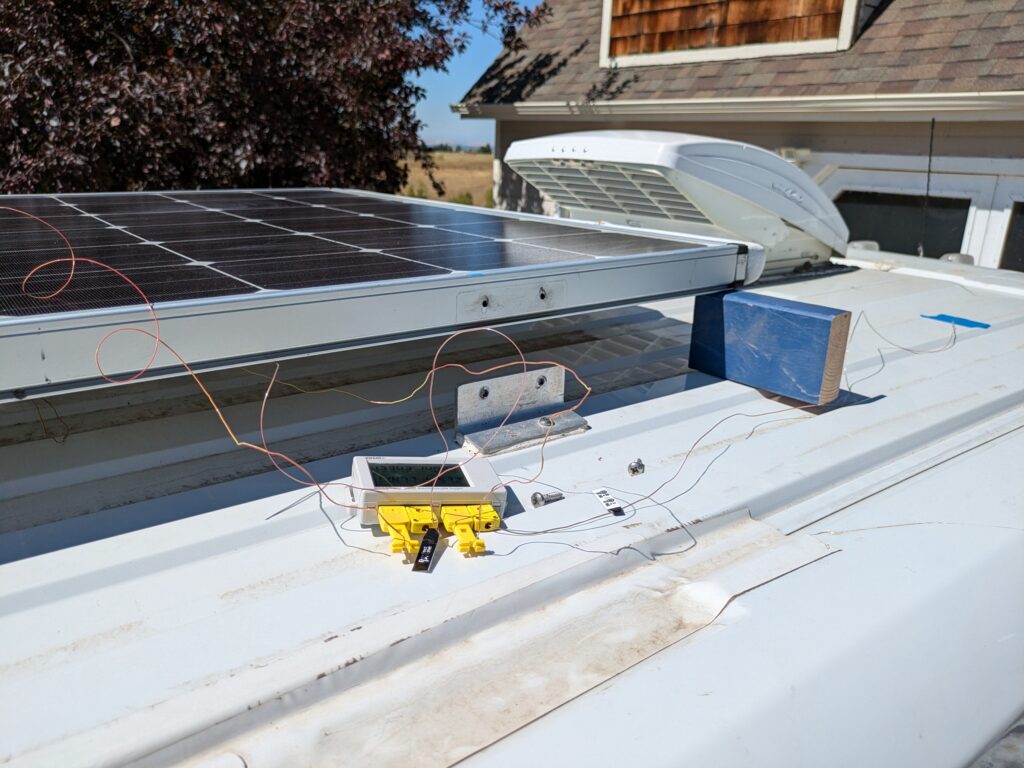

Temperature logging sensors were placed on the top and bottom surfaces of the PV panel, the van roof below the PV panel, the van roof away from the PV panel, an outside ambient sensor, inside the van on the ceiling under the PV panel and away from the PV panel, and in the middle of the van space.
In order to cover all the heat flows in and out of the PV panel during the test, I had the PV panel charging the house battery during all the testing. This means that about 20% of the input from the sun went into charging the house battery rather than heating the panel. I kept the SOC of the house battery low enough so that the Kisae DC to DC charger could charge full blast.
The wind velocity was measured and the solar radiation intensity was measured. Some thermal images were taken.
Clear, sunny, hot and low wind days were chosen for the testing. There was a bit of wildfire smoke – the mountains 20 miles across the valley were not visible due to smoke. The testing was started an hour or two before solar noon and (usually) stopped and hour or two after solar noon – this to minimize the variation in solar radiation levels during the test.

The roof TC away from the PV is located on the roof in the space between the Maxxair and the side of van.
Bottom Line
The chart below gives an overview of the temperatures of the PV panel, the roof below the PV panel and the roof away from the PV panel for each of the three configurations.
Don’t take these numbers as gospel – I did testing on three days, and this chart would be different for each day based on the sun, ambient temperature, wind and smoke for that day, but the relationships between the bars stays the same.
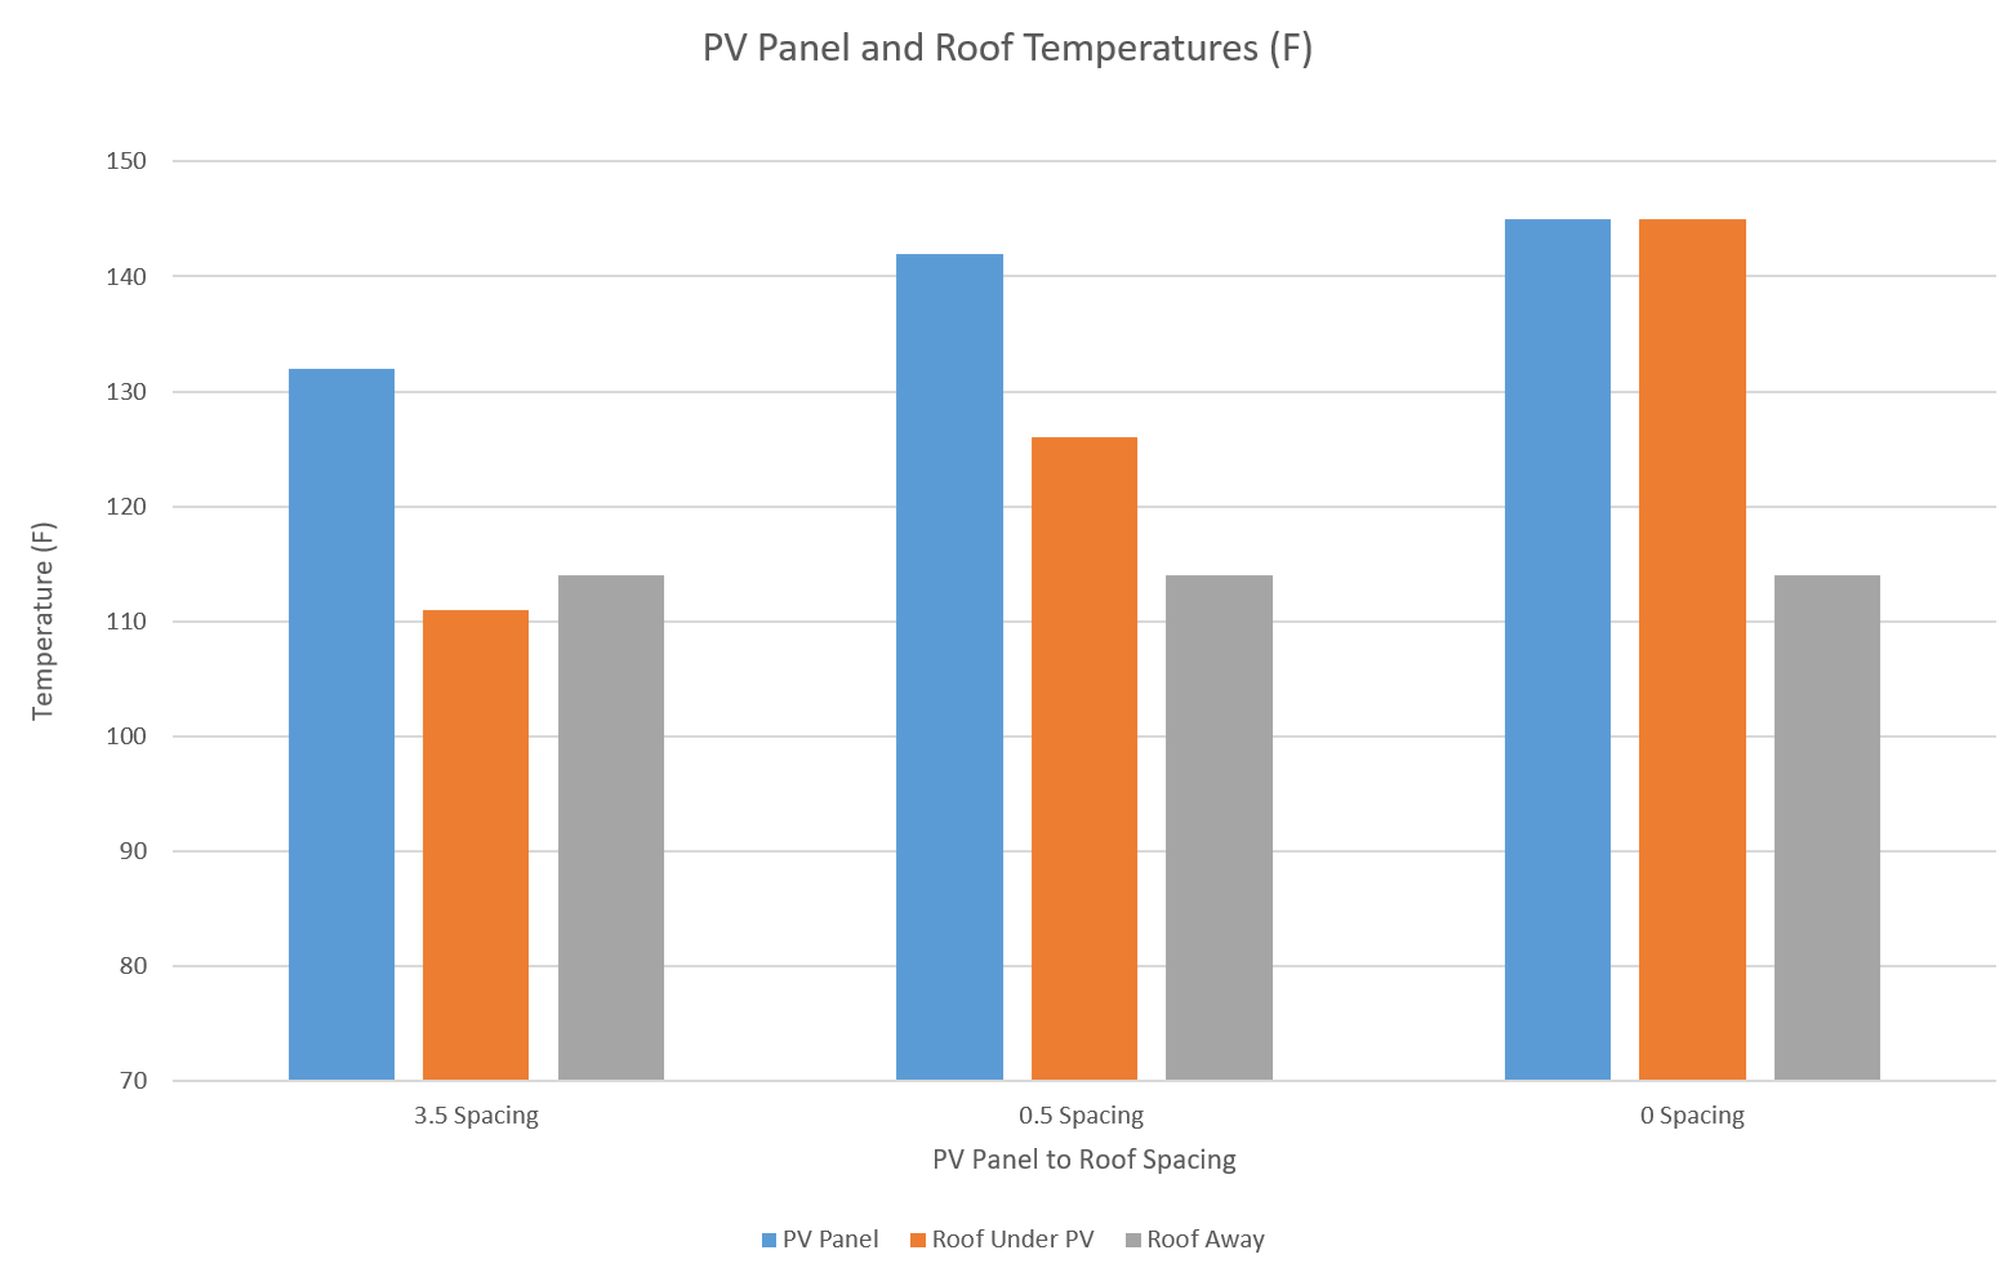
Blue bar – Temperature of the PV panel
Orange bar – Temperature of the van roof under the PV panel
Grey bar – Temperature of the van roof away from the PV panel
The PV panel spaced 3.5 inches off the roof runs the coolest with both the PV panel temperature and the roof under the PV panel temperature being cooler than the close spaced panel. The roof temperature under the PV panel is just a bit lower than the temperature of the roof away from the PV panel, but not much. So, if you are expecting the roof under the shade of a PV panel to run much cooler, that does not happen on this test. This is not to surprising in that while the PV panel does shade the roof under it, it is also pretty hot and radiates heat to the roof.
For the PV panel spaced as close to the roof as possible both the PV panel temperature and the roof below the PV panel runs significantly warmer than for the panel spaced 3.5 inches above the roof – the airspace and ventilation do make a difference (a bit of a surprise to me).
The thin plastic Sunpower pv panel temperature runs a little hotter than the closed space PV panel, but more significantly since the panel and the roof are in direct contact, the roof runs about 15F hotter than the closely space panel and 35 F hotter than the 3.5 spacing panel. I would not take this as a show stopper as these panels have many advantages and there are ways to overcome the higher temperatures.
Electrical Efficiency: The temperature increase for the PV panel as it is mounted closer to the roof decreases the efficiency of the PV panel, but the effect turns out to be small. For my 300 watt PV panel, the decrease in power output for going from the High to the Low spacing is a 7 watts. The decrease in power for the 100 watt flexible panel is XX watts.
Thermal Efficiency: The heat gain to the van in the PV panel area for PV panels mounted close to the roof or adhered to the roof is substantially increased – a 60% increase in the PV panel area for our test. This is a modest increase in cooling required if you have (say) 300 watts of solar, but if your full roof is covered with solar it get significant. This heat gain problem can be overcome by adding additional ceiling insulation – in many cases, a half inch more of Insulation will eliminate the excess heat gain.
Maybe its worth thinking a little about the physics of whats going on here to understand why shading the roof with a PV panel does not provide as much cooling for the roof as you might expect. The white roof of the van is reflecting something like 85% of the solar – its only absorbing about 15%. The PV panel is absorbing something like 95% of the incoming solar. So, the PV panel is absorbing something like 6 times the solar radiation as the white van roof. Something like 20% of the incoming radiation to the PV panel is turned into electricity, but all the rest is turned into heat (and when the batteries are full, its all turned into heat). The PV panel has to get rid of the heat and it does this by heating up until its hot enough get rid of the heat by radiating it and conducting it away to the surroundings – in this test, with an ambient temp around 85F, the PV panel has to get up to 140F or so to get rid of the heat. This means that the roof under the PV panel is living under a hot PV panel that is radiating to it and also heating the air between the roof and PV panel.
Testing
This is the plot of the results from the first day (8/30/24).
This was a clear, sunny day. There was some light wildfire smoke in the air.
The wind was very light all day – 0 to 1.9 MPH.
The ambient temperature started at about 79F and got up to 83F – the coolest of the test days.
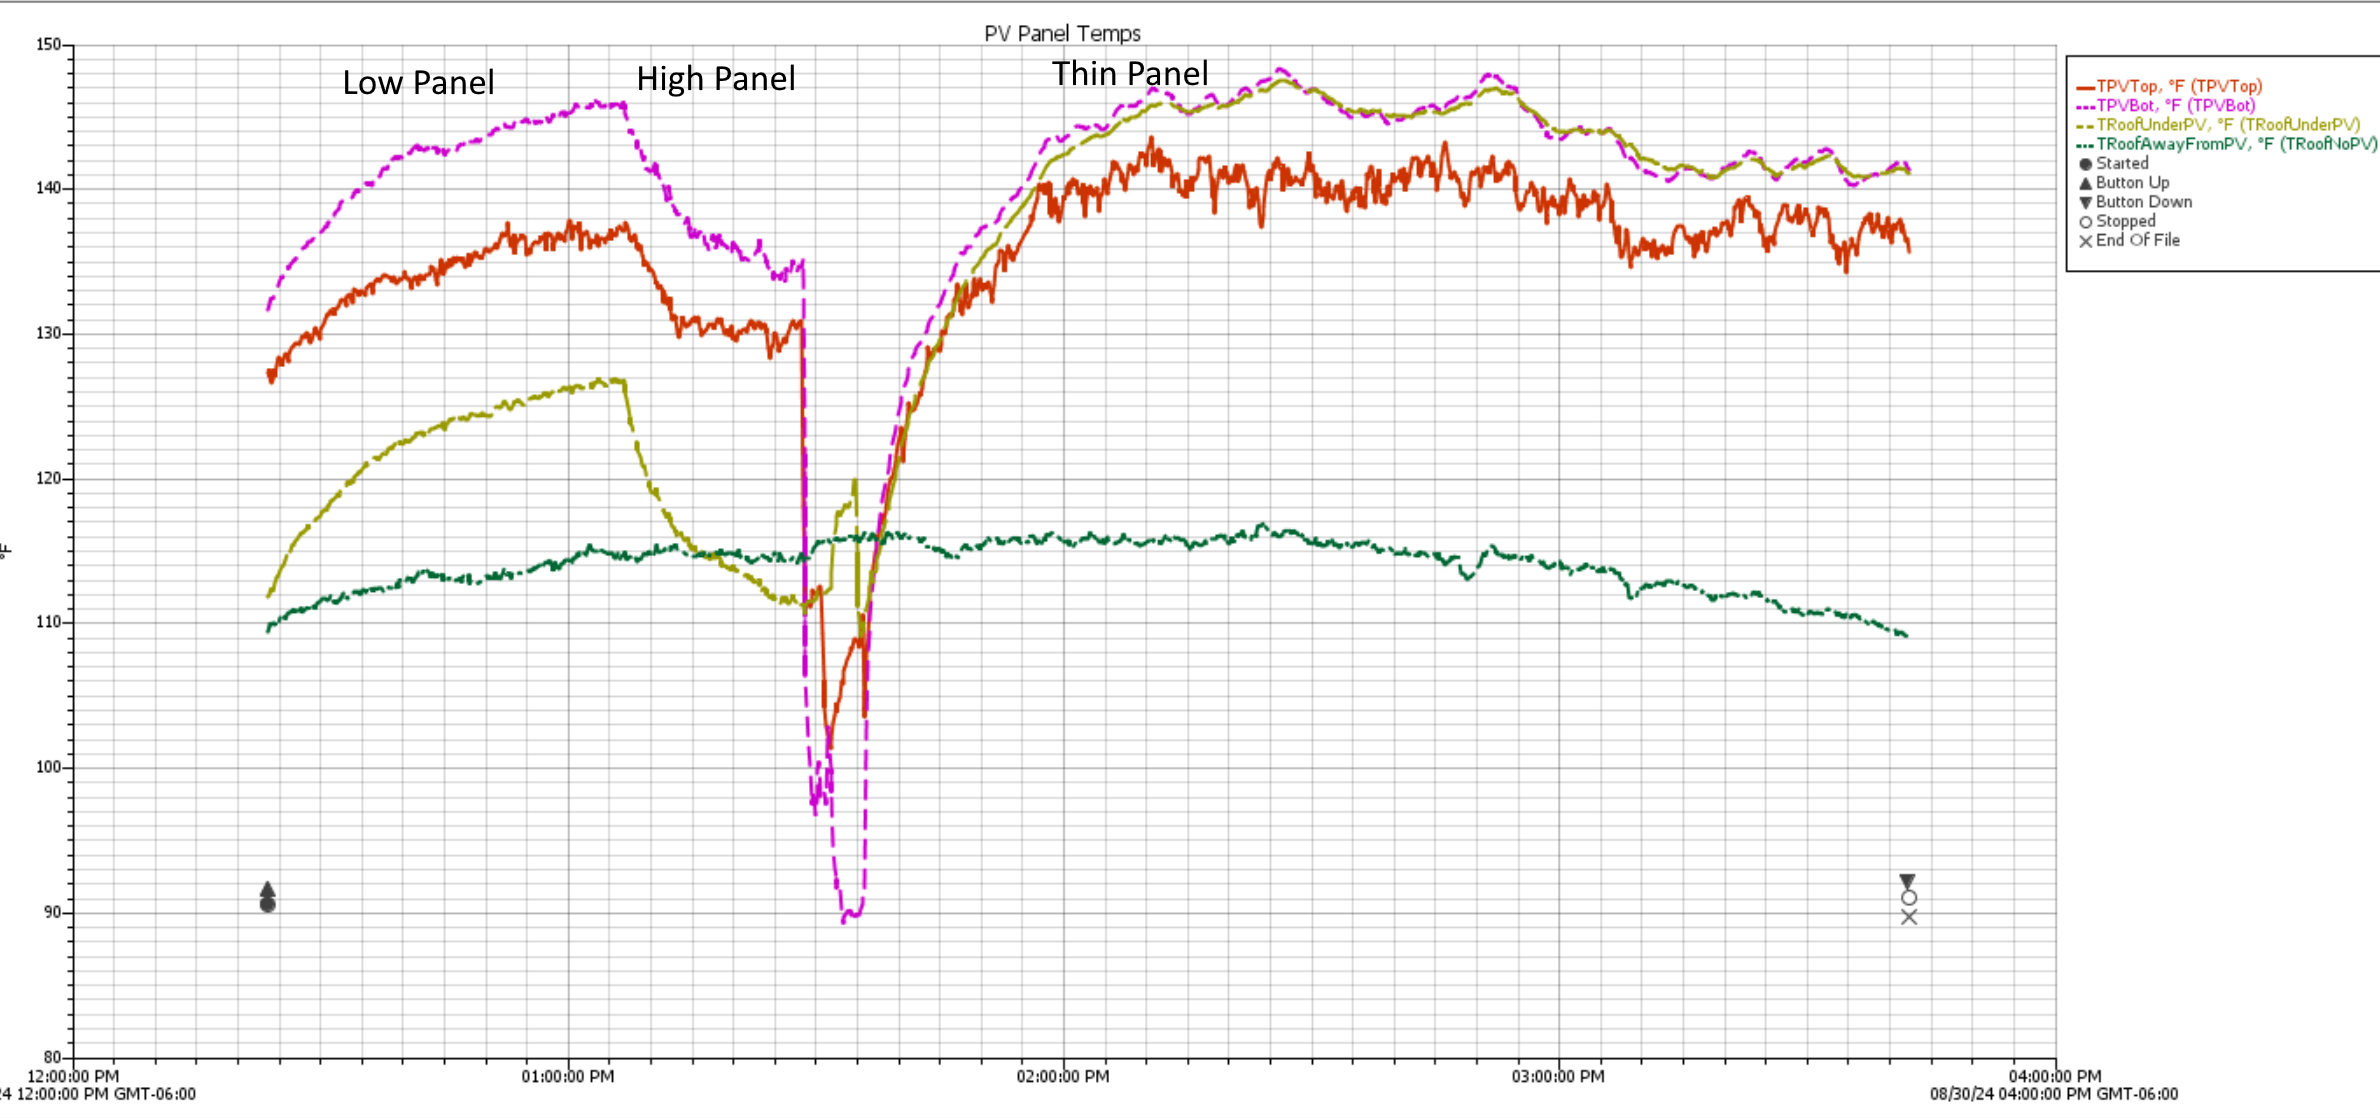
Red line – Temperature of top surface of PV panel
Purple line – Temperature of bottom surface of PV panel
Green-Yellow line – Roof temperature under PV panel
Green line – Roof temperature away from PV panel
The testing starts with the low mounted panel (this is my normal setup on the van). Note that the temperature of the roof under the PV panel (Yellow/Green) is higher that the temperature of the roof away from the PV panel – so, the PV panel does not provide cooling shade to the roof when its this low. The roof is about 12F hotter under the PV panel than away from the PV panel.
Its also interesting that the temperature of the bottom of the PV panel is a bit higher than the top of the panel.
Note also that the temperature of the roof (Green) varies throughout the test due sun and ambient temperature changes – so, you have to be careful comparing temperatures at different times in the test as they will be affected by sun and ambient temp changes.
The high panel is next. This is the same PV panel spaced off the roof using some short blocks of 2 by 4 to get it 3.5 inches off the roof on the edges – slightly less in the center.
The temperature of the roof under the PV panel drops over about 20 minutes from 127F down to 112F (A 15F drop) – I have to admit this surprised me, I did not think that a bit of airflow under the PV panel would make that much difference. The roof temp under the PV panel ended up going about 3F below the roof temp away from the PV panel – this is some cooling from shading, but not a whole lot. Part of the reason the cooling under the PV panel is not greater is that the PV panel itself heats up to about 132F, and it radiates to the roof below. The PV panel temperature is about 50F above the ambient air temperature.
With more wind, the cooling under the panel would have been greater – see below.
The big trough in the plot that comes next is my 82 year frame getting the big panel down off the van and taping down the thin plastic panel. I bought this Sunpower panel just to play around with it, and I have to say these panels are very nice – lightweight, thin, well made, look good and not visible at all from the ground – and no aero drag.
The thin panel gets the record for heating up the van roof. It gets up 146F compared to 116F for the roof away from the PV panel – a 30F increment. Not too surprisingly, since the PV panel and roof are in direct contact, the PV panel bottom temperature is the same as the roof temperature below it.
This larger increase in temperature will cause more heat transfer to the van interior, but this can be taken care of by adding insulation to the ceiling on the inside – see below for numbers.
Simulating Wind
I picked days with nearly calm wind because the wind would have made for too much uncontrolled variation.
To get a rough idea how much more wind would affect the temperatures, I set up a fan to blow under the PV panel. This is not much like a real wind, but it gives a rough idea of how much some airflow under the panel makes. The flow under the panel at the point nearest to the fan was about 5 MPH.
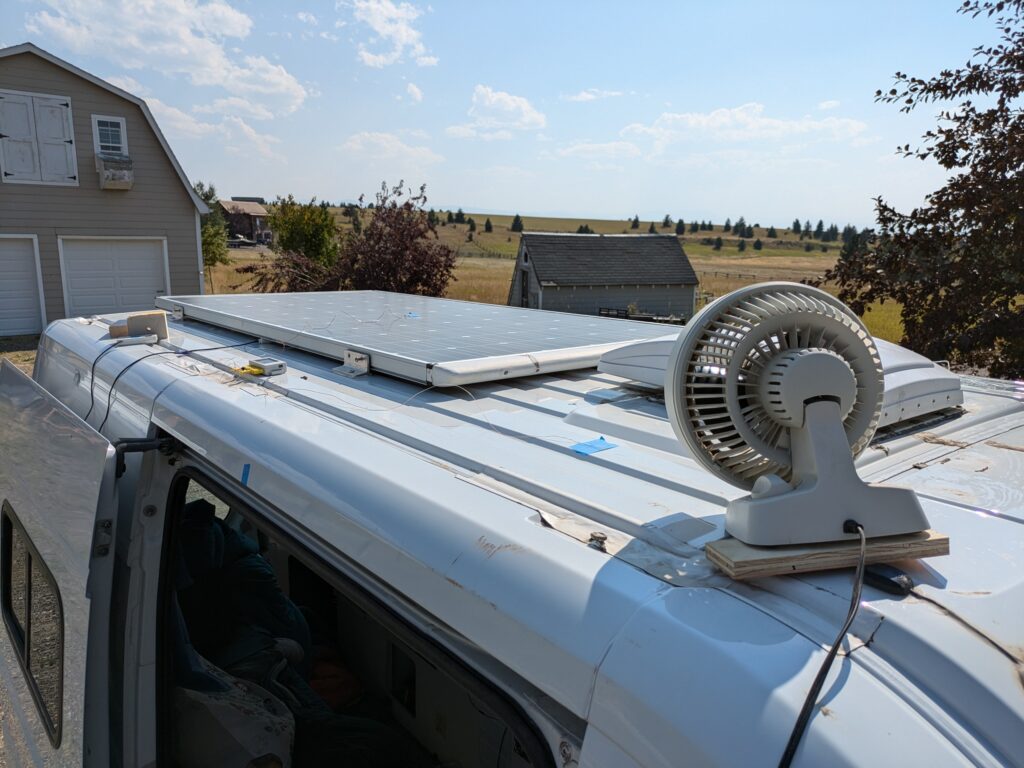
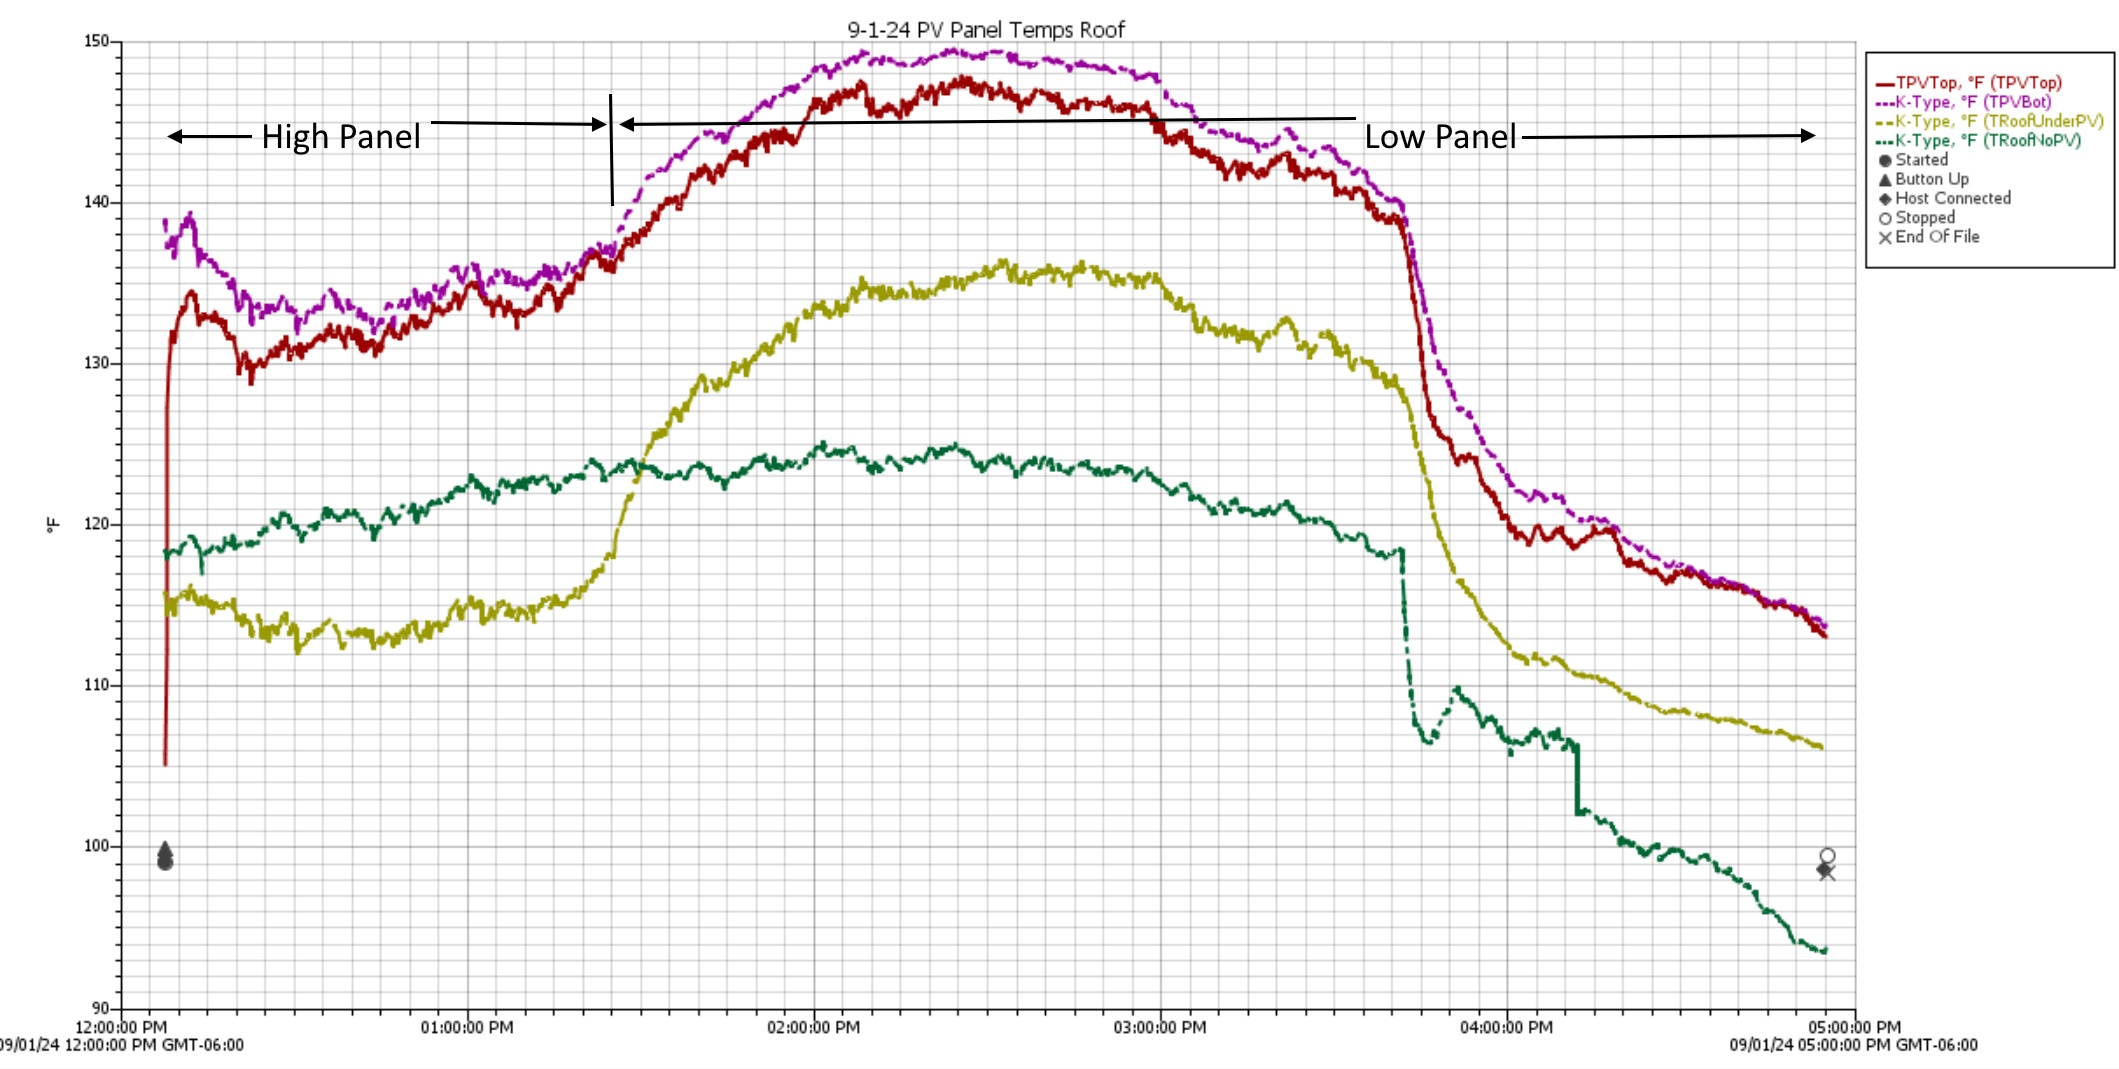
The plot above shows the effect of the fan starting at about 3:40 PM (the big drop toward the right of the plot). The roof under the PV panel temperature fell from 129F down to 106F (a 23F drop). The roof temp sensor that was not under the PV panel was also seeing about a 5 MPH breeze, and it fell from 118F to 94F (a 24F drop). This is rough, but it appears that the drop due to wind under the PV panel was about the same as the drop for the roof away from the PV panel.
The View From The Inside
IR pictures taken of the ceiling from inside the van.
An IR picture of the ceiling of van –
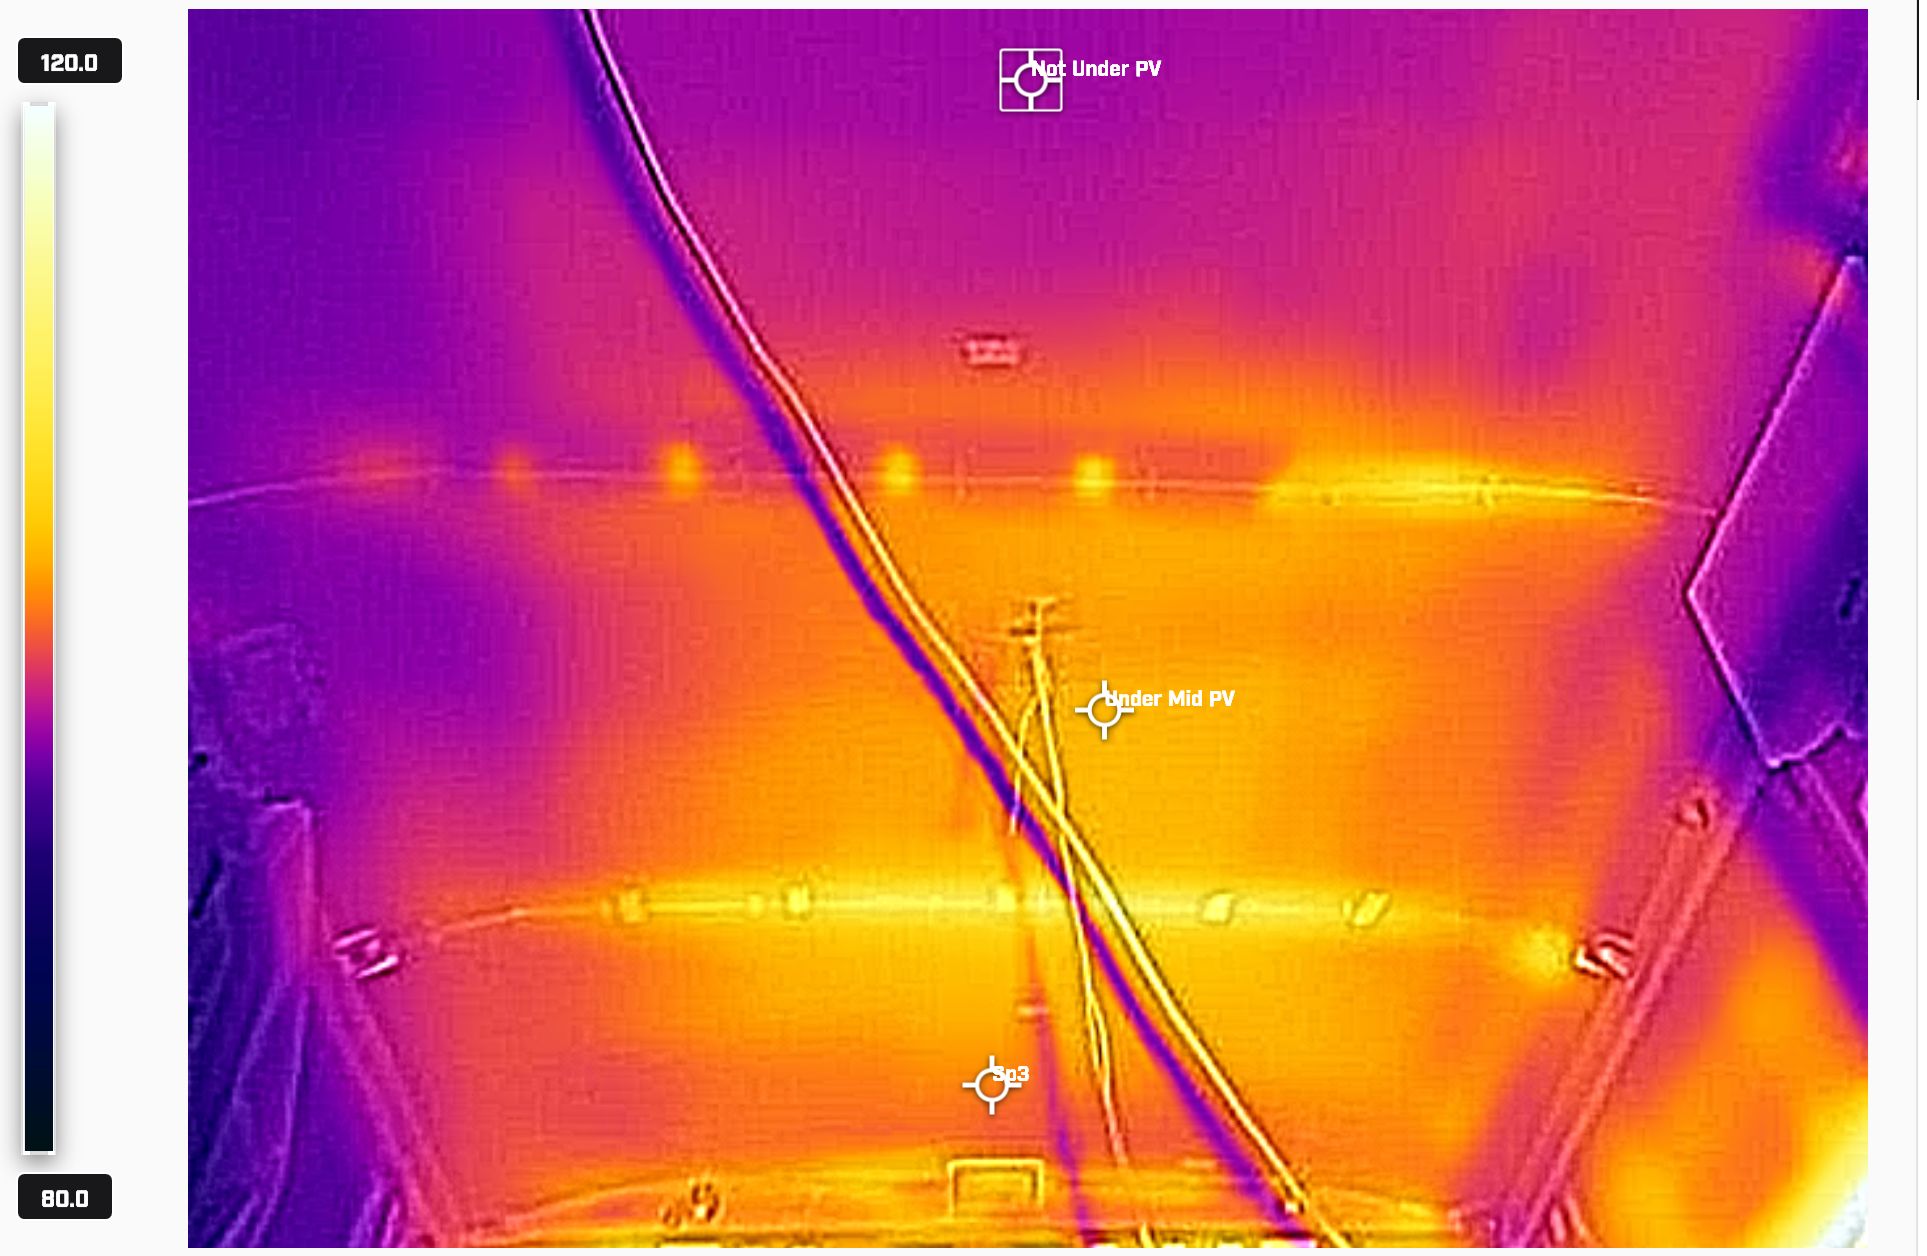
Picture taken from the floor looking up at ceiling.
Top of the picture is near Maxxfan and top of rear door is just visible at bottom.
The bright bands across the picture are the thermal bridges where the roof ribs are, and the bright spots are the screws that hold the ceiling panels in place.
The spot labeled Under Mid PV is near the center of the 300 watt PV panel – temp is 104F
The spot labeled SP3 near the back is 101.8F
The spot labeled Not Under PV (near the front) is 97.2F
It does look like for me it would be good to take the ceiling panels down, and install sheets of half inch Polyiso with these sheets being continuous over the ceiling ribs. This would give me some more R value, offset the PV panel heating, and get rid of the thermal bridges.
So, How Much Does It matter?
As far as I can see, there are two negative effects of the higher temperatures for the low mounted PV panel vs the cooler high mounted PV panel…
- The hotter PV panel will suffer some loss in power output as it heats up.
- More heat will be transferred into the van as the roof sheet metal runs hotter under the low PV panel.
To weigh against these negatives, there may be some improvement in aerodynamics and MPG.
PV Panel Performance Hit
To estimate how much of a gain in PV panel output we get from having the panel 3.5 inches above the roof compared to 0.6 inches above the roof…
In the test done on 9/1/24, the PV panel temperatures were…
- The low panel at 0.6 inches off the roof runs at 148F (64.4C)
- The high panel at 3.5 inches off the roof runs at 132F (55.6C)
The temperature coefficient for an average PV panel is about 0.35%/C, meaning for each degree C increase in temperature the PV panel power drops 0.35%.
If you go through the math with my 300 watt panel as an example…
Output of my panel at 25C (STC standard) 300 watts
Output of my panel 3.5 inches off the roof at 55.6C is 268 watts
Output of my panel 0.6 inches off the roof at 64.4C is 259 watts
So, mounting my 300 watt panel low to the roof costs 9 watts compared to mounting it 3.5 inches clear of the roof for the conditions of this test (clear day, 92F ambient). Its there, but it does not seem like a lot?
Percentage wise, the thin panel takes about the same hit as the 0.5 inch spaced panel as the reach just about the same temperature.
I should note that the actual output of my panel during the test averaged about 205 watts. The difference between this and the 260 or so watts above is likely due to the panel being flat, some years of degradation, and some smoke in the air from wildfire season.
Heat Transfer to van
The roof under the low mounted PV panel runs about 134F while the roof under the high mounted panel runs about 113F – so, about 20F hotter under the low mounted PV panel. This will result in more heat transfer to the van under summer conditions and will make it harder to cool the van.
If we assume that the inside of the van at ceiling level is maintained at 80F by an AC, and the ceiling is insulated with 1 inch Polyiso, then …
- Heat loss per sqft under low mount panel is 7.7 BTU/sqft-hour
- Heat loss per sqft under high mount panel is 4.7 BTU/sqft-hour
The heat transfer into the van in the PV area is about 60% higher with the panel set low to the roof than with the panel spaced 3.5 inches off the roof.
My 300 watt panel is 22 sqft, so the low mount panel would need 66 BTU per hour more cooling to maintain the same temperature in the van.
If one maximized the amount of roof covered with PV panels, the 66 BTU/hr would be more like 200 BTU/hr.
This added heat loss could be offset by adding more insulation to the ceiling. An added ½ inch of Polyiso would almost do it. This insulation would also help for other situations – like cold weather trips.
Also, bear in mind that these differences apply only to daytime when the sun is up a ways on clear or partly clear days. During nights and cloudy/rainy days there is no significant sun on the roof.
Aerodynamics
Comparing a PV panel mounted down as close to the roof as possible to a PV panel spaced off the roof several inches, it seems intuitive that the low panel will have less drag and it probably does, but I don’t have any evidence one way or the other on this. If you do, please let me know. This test seems to provide some evidence that my single, 300 watt PV panel mount as low as possible and as far aft as possible does have low drag, but it does not say anything about what might happen to the drag if I raised it up off the roof several inches.
If you end up putting in a full roof rack in order to install PV panels, than you can be pretty sure that there will be a significant MPG penalty – this test shows about 2.5 MPG. There are things that can be done to minimize the drag penalty for a rack, but I’m not sure if increasing the spacing between the roof and the panels helps or hurts.
Aerodynamic changes can be fairly powerful. A 0.5 MPG drop over the 200K mile life of the van is about 260 gallons, or around a thousand dollars or 5K lbs of CO2.
Comments?
If you have any thoughts or questions on this, please leave a comment below.
Gary 9/3/24
Even if using typical radiant barrier foil, with the foil directly on the back of the panel, the upper surface remained cooler than if the PV panel is glued directly to the white membrane roof.
The operational temp is also affected by the tilt angle. most solar panels are mounted on pitched roofs. In an RV application, the panels are typically mounted flat so they never receive direct sunlight, even at noon, in northern latitudes.
As for having an air gap on both sides of the radiant barrier, one way to do that is by using sheet aluminum (rather than foil) as part of the mounting structure that allows the panels to be angled more directly at the mid-day sun.
In case you want to test it, this site sells much smaller rolls (for less than $20) than most others:
https://www.usenergyproducts.com/collections/super-shield-radiant-barrier-1
FYI: my tests were done with the same type of panel you used, SunPower SPR-E-Flex-100 (which is now discontinued but still widely available.
Sol-Go panels are virtually identical, except they have a few more cells on the same size panel.
p.s.: I think the title of this article should begin with “Effect of…”
p.p.s: check your gmail re: two free Comair Rotron fans you can have, if you want them
Hi Elvis,
Thanks for all that!
I’m in think mode on what more might be useful to do in this area.
Gary
FYI: try the same test, adding a comparison with some isolated part of the top surface of the van under “deep shade” (e.g.: the hood is several feet below a substantial fixed shelter/carport roof),
and on the solar exposed part of the van roof:
1. radiant barrier on the backside of the PV panel (air gap only between the radiant barrier & the van roof), and
2. radiant barrier suspended slightly below the backside of the PV panel (air gap on both sides of the radiant barrier).
Then the question is, how much space is required when the radiant barrier has air gap on both sides, for that part of the van roof to (nearly) match the part under deep shade temp? Answer: not much. Hint: a slope to facilitate convective airflow in the gap(s) also helps.
Hi Elvis,
Interesting things to try – maybe later this summer.
I’d guess the PV manufacturer might not like adding a radiant barrier as is would make the PV panel run even hotter.
While the physics of a suspended radiant barrier is interesting,from a practical point of view it would be quite a challenge to figure out how to suspend it and how to keep it stable driving down the road 🙂
Gary